Saturday, February 23, 2019

A Trio of Hats

It's always nice when projects start going by quickly.
I completed my hat for Brother-in-Law J:
I think it turned out well.
It's Antler Toque by tincanknits. I made one ages ago for J, but it was too small so I appropriated it and have been wearing it ever since. This was delivered to J about a week ago, and he likes it! Always a plus; he was going to have to keep it regardless. 
I started the gray and blue bow hat for Cute Baby:

It's loosely based on Bow Baby Hat by Cassandra May, tweaked for size. 
Without bow.
With bow, as it was meant to be.
Since it was too big, I briefly played around with the idea of putting in a few seams to slim it down, but no dice. So I turned it up and stitched it down some:
Oy.
It fits now, sort of, but doesn't look great. Cute Baby might just have to wait for this one. Grow, little baby, grow!
As we have discussed before, this is to avoid everyone getting frazzled by assuming she's a boy in the little blue/white/gray onesies that we insist on putting her in regardless of social gender norms. I also caved and cast on for another hat in the teal and orange colorway:

In my defense, I needed something mindless to knit while on the road doing errands. J's hat was not complicated, but more so than I wanted to drag around with me daily, and the bow hat had reached the decrease stage and so needed an extra needle I couldn't immediately find.
However...I don't like it. I put the pompom that came with the Caron Cupcake kit anyway, but the self-striping yarn just DOES.NOT.WORK with this size hat. I like the turquoise, I like the orange and yellow-ish contrast, but gosh darn it when the stripes end up being in the exact center of the hat, I just don't think it looks right. Sigh...
I also decided to dress up the first orange-only hat as well so it would be more useful. They both are well made and a good size for Cute Baby right now, but the orange one has the above-mentioned gendered problem and is just a little too plain. My Friend K had crocheted Cute Baby a beautiful hat with one of the overlarge flowers that are so popular in baby wear right now. I don't crochet, and the one learn-to-crochet magazine I have made flowers seem a little intimidating for a project that I wanted done and done now. To Ravelry we went to find a knit version of the oversized flower.
I found the easily named Flower Scarf by Robyn Diliberto. Her method seemed simple enough: start with 9 stitches, increase 2 stitches to every stitch 3 times, to 27 to 81 to 263 stitches in 8 rows. Yikes. I thought it funny that the designer felt the need to defend her method right away in the Ravelry posting; stating she didn't see what everyone was complaining about in terms of the difficulty of this method. She said she "used longer dpn’s and it was not that difficult. If you are having a hard time be a creative knitter - try working the flower on two circular needles or magic loop." She also recommended working it flat and seaming it up, but I dislike sewing and prefer minimal fuss with finishing up so I went with circular needles. 
I bring this up only because, despite Robyn's disbelief, increasing stitches as quickly as this is in fact difficult to manage. 
Can you feel the tension in the stitches?
Things quickly got out of hand as the number of stitches exploded. I know I knit tight tension, but by the row of 81 stitches it became very difficult to knit without dropping stitches. So I increased the number of needles to help spread out the surface area.
This is version #2 with 5 needles total.
Even this was difficult to handle as the flower exploded towards 263 stitches. It quickly became ridiculous. 
Yeah, that's right.
I did actually work that. I can't say it was the most fun and I could definitely feel it in my wrists and finger pads after it was done. 
I'm not sure if I'm happy or sad to say...
Awww...
It looks super cute! I really like the effect. It's nice and 3D, the turquoise color pops with the orange and mustard well, and it makes it a little more 'girly'. I'm happy with the outcome, but I will officially disagree with Robyn. You're wrong, friendly designer Robyn. Your design is, in fact, a pain to work with. My evidence to that opinion:
Yeah.
These are all the needles I needed to make the flower accent without hurting myself, without dropping stitches every 2 seconds, and not making me hate my life. 
A little more organized.
No pattern/piece that takes 4 double pointed needles and 5 circular needles to complete could be considered "easy" and "not a pain to work". The jury is still out on whether or not it was worth it. 
At least now I know I have 4 sets of #6 circular needles for some reason. 

Sunday, February 3, 2019

First of Many

As you might have gathered, I had our first baby late in 2018. Many people have given me crap for not knitting anything for the baby yet. Other people have made things for Cute Baby (her daddy decided that should be her online name): Grandma knit a dedication blanket and a Christmas stocking, other Grandma made a quilt, Aunt W made a quilt, Friend K crocheted a headband and hat, etc. Baby is very well-loved and warm. But I am a knitter, and so Mommy-mades are a requirement, apparently.
Trick was, Tall Hubby and I didn't find out the gender of Cute Baby prior to her birth. It irritated our friends and family to no end! It also contributed to why I didn't make or start anything. I'm okay with all of this though, as I personally think gendering babies from day 1 is stupid and I dislike pastel pink and blue anyway. So my little girl is in gray, navy, white, tan, yellow...deal with it.
But while on a trip to Michael's with SIL M, I found these:
Such great colors!
They were apparently meant to be turned into little pompom hats, and I thought it would be a perfect starter project for Cute Baby, bought a skein, cast on...
And then had a baby. Also as previously stated, this meant knitting time went downhill quickly. I also decided to knit Christmas and Baby knitting went to the bottom of the priority list. So it was finally finished a few days ago.
Nothing fancy.
And it fits,
Mostly.
But I was not happy with it. Why, you might ask? This is the remaining yarn:
Can you guess the problem? 
No, it's not that there is so much yarn left. In the finished hat, there's no hint of those gorgeous teals! The trials of making small things. The accompanying orange pompom would blend right in rather than being a statement. Sigh...
I refuse to frog it. It's well made, it fits, it's warm. It's just also not what I wanted for Cute Baby. So I guess I'll have to cast on another one. Thank God they're fast.
...too bad I already also started on a toque for my Brother-in-Law J:
Leftovers from the Cunning Hat
My ultimate goal for 2019 is to get through as many of my UFO, Upcoming Projects, and Needs Repair lists as possible so I can embark on a grand knitting project I've been planning for years. I think it's a common malady of knitters and creators in general that the Upcoming Projects list never ends, only gets added to. Regardless, I shall strive to finish one orange hat before starting a third. 


Sunday, January 27, 2019

A Cunning Hat

Back in November, I was faced with what I thought would be an enormous amount of semi-free time.
This little one had something to say about time usage though.
I decided I would knit Christmas presents during my maternity leave, also to go along with my broke sisters' decision to DIY Christmas to save some money. My plan was mitts for Sister C-2 to match a hat I made for her years ago, a requested striped scarf for my mother, and a cunning hat for Sister C-1.
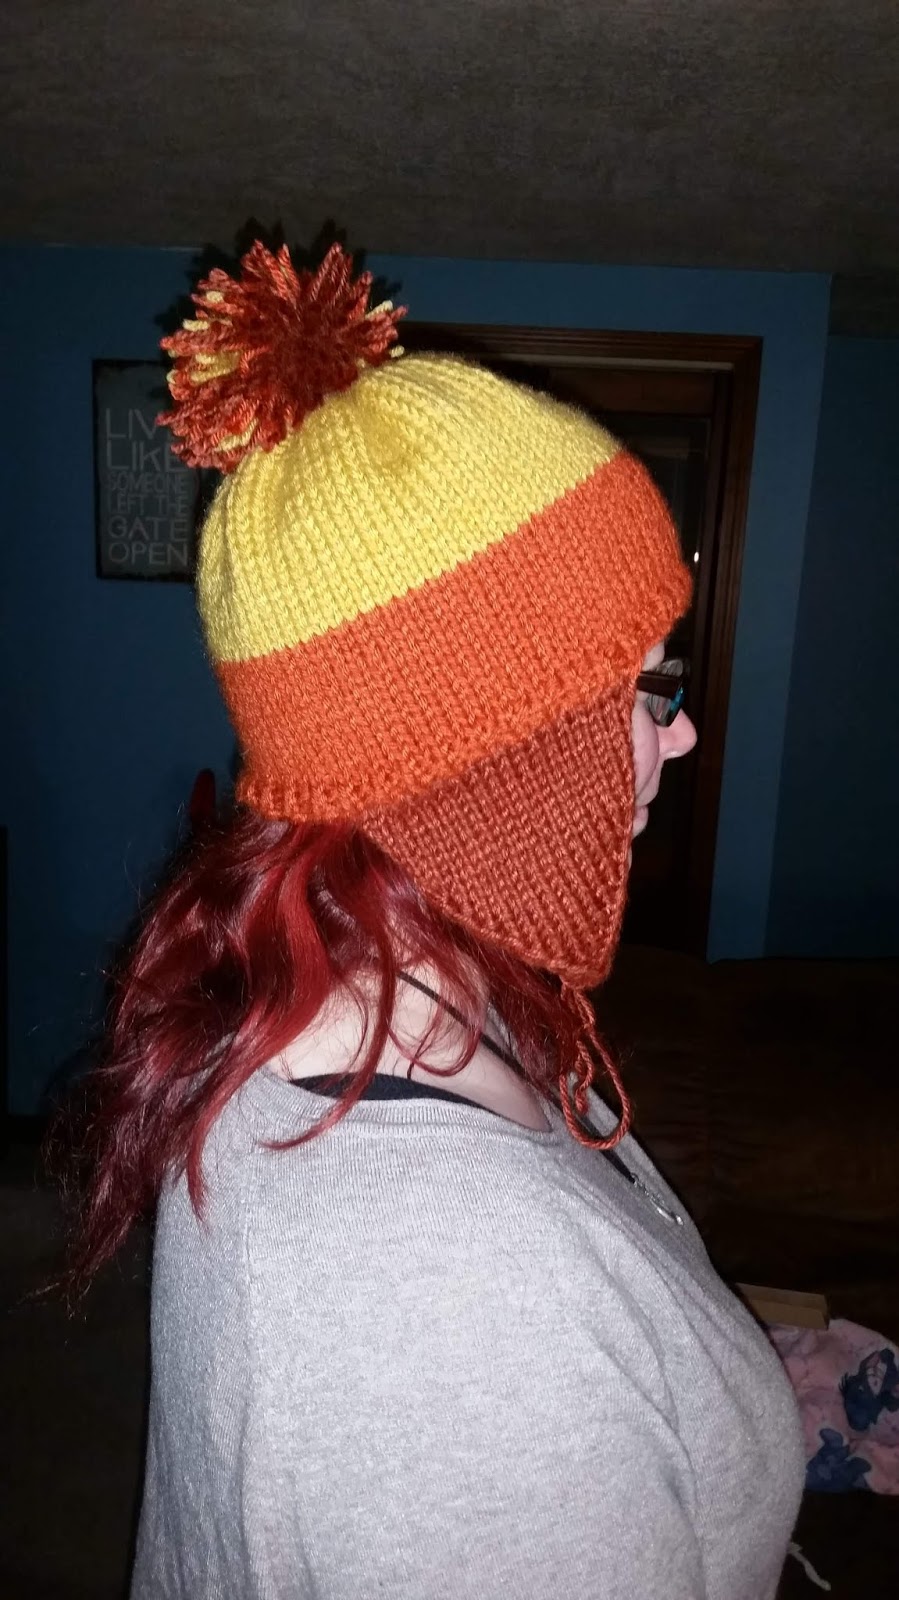
This was a request as well, I believe. We are a nerdy family and I think I can say C-1 is the most open about it. This based on Jayne Cobbs' handknit hat from the cult classic, too-short TV show Firefly. I used the pattern from Glitzy Faery for the most part. C-1 came with to pick out yarn and we decided on what we thought were more screen-accurate colors, rather than the more commonly accepted trio of colors (i.e. mustard/pumpkin/russet rather than yellow/orange/red). A small difference, just personal preference.
I have no in-progress photos because, as any new mom can tell you, a small baby takes up quite a lot of time.
Sister C-1 modelling

Looks rather good, doesn't it? 
Just for comparison...
Pretty cunning, doncha think?
This was the only gift done in time for opening presents on Christmas Eve. It was also the calmest, least ...interesting...not, thankfully. Still fun and a decidedly nice product that my sister loved.

Wednesday, October 24, 2018

Recap #2 - More Baby Things

Two of Tall Hubby's cousins out in Colorado had beautiful baby girls earlier this year. It's an ever-expanding family, this one.
One was a decidedly pink-for-little-girls kind of family (which is completely fine) and the other family I made the executive decision not to ask. Looking through our local Michaels, I came across these really cool Caron Cotton Cakes in fun colors, one including a hot pink variety. 
Ain't they cute?
I liked that they were self-striping as well, which cuts down on the design work on my end. Both girls were due in the spring and as my new policy is to knit for 1-year sizes to maximize use, I was looking at summer sweaters. Cotton seemed like a nice weight and breathable material for warmer weather.
I also went with my go-to summer pattern, In Threes, so the self-striping would add some further interest to a fairly simple pattern. 

I like it.

The self-striping also ended at very advantageous points. 
This one is for Baby K and is waiting for ends to be sewn in and buttons to be sewn on. I do hate hand sewing, apparently. I've been procrastinating on this one for quite some time now.

Take #2, still striping into very convenient points. 
Getting towards the end.
This one is for Baby S and is actually finished as well. I sat up late and finished the edging, sewed in all 4 ends of both sweaters, and stitched on the buttons. I had them in the mail the next day without realizing I forgot to take ending shots of them. Whoops!
But they are done and on their way to their intended recipients. Yay!

Saturday, October 20, 2018

Recap #1: Blue Ballgown

Good Lord, it's been a long time. So, what will follow is a series of catch up posts, starting with the Blue Ballgown.  
It turned out very well.
Clearly, my Sister C-2 and I made it to the Midwinter Civil War Ball, way back in February. I did finish the eyelets, it was a long slog, but it got done.

There was much dancing.

And everyone looked very nice. 
Aside from one incident where my drawers came untied in the middle of a dance and I had to dash to the bathroom to fix things, we had a very nice time.


Monday, February 19, 2018

These Things are So Effing Small...and Only Getting Smaller

As I mentioned last time, I have a big hand-crafting project to finish on a deadline. The 22nd Annual Mid-Winter Civil War Grand Ball is coming up and my sister C-2 would very much like to go. I have gone in the past in not appropriate attire and it was very awkward. I decided I no longer wanted to look inappropriate so my DDM and I set about working on a period-appropriate ballgown.
This one, with the lace on the collar and sleeves. 

In Felicity-ballgown-blue polyester silk and trimmed with black lace with beads. 

I got together with Mom to continue working on the gown. I put on the corset, stunned to find it still fit after a solid year, and put on the skirt and bodice, which had seemed a mess of issues last year. The skirt was still messily too long and needs to be hemmed, which will be a bit complicated as Mom is turning out to be a big perfectionist about this. We decided to try for a little bit of trim along the bottom edge as well. Then we turned our attention to the bodice. It still didn't seem to be fitting right. I stood still as Mom examined it. Suddenly her face cleared a bit, she reached out to the edges of it, gave it a firm yank down around my waist, and everything magically fell into place, right where the sleeves and collar and waist were supposed to lie. Jeez.
So we aren't as far behind as expected. Good. Great.
My next step became clear. I needed to start working on the closures for the bodice. To be accurate, the historical closings are corset-like lacings through hand-stitched eyelets. We would have just cut corners and done modern grommet placements, but our local store did not have black grommets. So I get to do this by hand, like they did in the 1850's. Great. Fifteen eyelets on each side, 3/4 inch apart, 3/16 inch around. Thirty total.
Thank God I have two more weeks, these are going to take gorram forever.
My first two.
Clearly I learned a few things between the first, down by the bottom edge, and the second. These two took me a solid hour and a half all by themselves. Making sure they're big enough for the specs is difficult; they're supposed to be 3/16" around, or 4.75-ish mm. That feels huge, but it's really not. My tools for making the holes were actually too small to start with.
My workstation (the keyboard of my laptop) is kind of a mess right now, anyway.

My scaling tools. 
The smallest needle is what I've been using to part the threads of the silk, rather than punching through it. Then I go in with the metal and plastic yarn needles to make the hole larger, and finally go through with the wooden knitting needle to get the final gauge. It feels a lot like stretching ear lobe piercings, not going to lie.
Either way, these two are actually still smaller than they're supposed to be. I don't know how I keep shrinking them! Ah well. I'll just use the yarn needle to help pull the lacing ribbon through when I go to put the sucker on. 
But remember how I said these eyelets are small?
That's the whole edge of the bodice on my lap.
Can you see where I was working? Two down...twenty-eight to go. Whoo boy. 
(I should be grateful though, in the end. Chelsea over at "A Sartorial Statement" came in at sixty-six eyelets for her 18th century maternity stays. Yikes!)

Monday, February 12, 2018

A Finished Thing!

I finished another thing!
Remember I was knitting for Friend M's Baby O a while back?
That was this one, oh so long ago now.
It's the Wee Stripes Pullover, and I liked the color way and pattern enough to start a second, exactly the same version just a size up for Friend A's Baby M who was born in December. Last time we saw it, it looked like this:
Very sad.
Well...
It is in fact completed!
This one turned out just a little wonky; the tension at the bottom being a little tighter than the rest of it, and the seaming up being a little sloppy because I was in a hurry.
Button band and all.
I found these nice gray wooden buttons for both Baby O's and Baby M's sweaters, so they're super matchy-matchy. 
Look who came to visit!
I put the sweater on Tammo's level to take pictures of, making it part of his domain and so needing a thorough inspection. We also saw the new movie Peter Rabbit this weekend and so I thought a bunny photo would be appropriate. 
This was good timing, as I had another big hand-crafting project to finish on a timeline, so getting this sweater out from under me was a large weight off.


Thursday, January 11, 2018

Oh wait, that's knitting!

Back to some knitting!
I'm starting to feel like the Yarn Harlot, Stephanie Pearl-McPhee, when it comes to my sock knitting. At the start of this evening, I had 2 different socks on the needles using the same pattern. I like having a sock in my bag because when I'm not having to fuss about with provisional stitches for the heel, decreasing for the toe, or shaping for the heel, they're really straightforward knitting. The nice thing about self-striping yarn, or yarn dyed so as you knit it naturally forms horizontal stripes without you as the knitter having to change out yarns every stripe, is that it can look really fancy or interesting while just being plain stockinette stitch.
So I have this pair:
Pretty sure you've seen this one before.
This is actually sock number 2. I finished the main body of knitting on sock number 1, minus the heel shaping, and still needed something for my bag because I can't do heel shaping in the dark of a movie theater and we were going to see Darkest Hour, so I cast on sock number 2 right away, like a responsible knitter.
I'm actually already past the heel on this one, so this pair is moving along pretty quickly:
I didn't have any contrasting yarn, so that out-of-place variegated row is going to be the heel. 
I will freely admit to using the same sock pattern over and over again. The above crazy green/pink/blue/white pair is my third set of this pattern. My printed-out copy of the pattern is dog-eared and rumpled and stained from being in my daily purse for so long, but I know it well enough to barely have to look at it anymore. I know it's 60 stitches to cast on for my size and if I have another of the socks nearby for comparison I can tell whereabouts the heel row should go and when to start decreasing for the toe.
The real reason I started on the second crazy green socks is because I had picked up the heel shaping on my second pair of these socks. Remember when they looked like this?
It was like this for a long time, really. 
Well, now that sock looks like this:
Wow, a completed sock!
For some reason I decided the responsible thing to do with this pair was to fully complete the first sock before casting on the second. I really don't know why my approaches were so different between pairs, but there you go. As soon as I finished the main body of the sock I picked up the heel stitches and got going again. 
I found it amusing that it had a complimentary color scheme to my 2017-Christmas-present Smartwool socks. 

Nice little triangle heel.
This is the afterthought heel again, which is great for keeping the pattern of the self-striping yarn (mostly, you can see the grey-tan-grey stripe toward the left got a little lost on the other half). It also works well if you happen to find yourself running out of yarn at the end of the toes because you can just put in coordinating yarn for the heels and toes as needed. 
They fit pretty well, just a tiny bit short along the length of my foot and my usual problem of large calf muscles that taper quickly to my ankle, so without a lot of 1x1 ribbing to hold them up (which I don't like the look of and is boring to knit) or decreasing/increasing along the leg for the same purpose (which I never remember to plan for or write down so I can duplicate it), I just have to deal with some bagginess at the ankles/leg bits.
I also managed to tidy up the gappy bit at the corner of the heel shaping. Yay!
Overall, I still like this pattern (clearly) and it's well on its way to being a staple of my knitting cycle, especially as I keep leaving sock yarn on my Christmas list, so my in-laws keep getting it for me :) Not a bad way to go.
They clearly know my colors. 

Friday, December 15, 2017

Still Not Knitting

So for my second fancy napkin, I decided to up the ante to "Varsity" level. This meant doing a double rolled hem with mitered corners and topstitching. I'm told it takes less thread and looks much, much neater overall.
It's pretty simple too, minus all the pressing. You fold the hem over a certain amount, press, repeat. Then you miter your freaking corners, which is not as easy as it sounds, then sew it down. Like so:
Oh so neat and tidy!
The thing about mitering double rolled corners though: I think this lady's instructions are stupid and make no sense.
She says do all the rolling and pressing as instructed. Then open it up and draw a line diagonally with the center at the 2nd pressed line. Fold the first pressed line in. Well, in that case you can't see the freaking line you just drew as a guide. I folded it back as instructed, lined it up as best I could, sewed it, clipped it, folded it back as instructed, stitched all along it. And you know what?
Bleh.
It looked like garbage. I'm willing to put some of it down to user error, but I want to clearly state that the whole process seems flawed. What is the point of a guideline you can't see to guide you?
So I scrapped all of that and started playing with other ways to miter these corners that might give me a better result.
Meh.

Not bad!
I think with that last one I nixed the first fold over before mitering and just turned the whole corner in? I've already forgotten, but I have six more napkins to practice with, anyway!

But at this point I had to take a hard stop from making napkins and move on to the next project: Picnic Placemats. 
Does that sound a little silly and useless to you? It did to me. But then I realized it could A) be a knitting needle holder and B) could be modified into something else I needed. 
My brother-in-law requested nice drawing pens for his birthday, and I was happy to oblige. However they came in a plastic baggy that was disintegrating by the time Amazon got it to my door. I needed a better solution. Why not a modified 'placemat' with channel stitching for the pens? 
But the pens are narrow and this pattern looks big and bulky with wide binding. What if I tried to modify it more to be more like my professionally made knitting needle holder without having to bind edges and it might make the profile smoother and more user-friendly...
Nope. My mother and unofficial sewing mentor said nope. She said do it the way they tell you to first and THEN you can get cocky and think you can make all these adjustments without preplanning and minimal skills. 
I hate it when she's right :)
I had already cut out the materials for a by-the-book 'placemat', so I wouldn't be wasting materials. 
So I basted, turned over the pocket, and got started on how to miter 3 inch binding. The first one went about as well as you'd expect. The second however...
See the lining up of all the horizontal bits? That's what's supposed to happen. 
So I bound my fuzzily cut out binding strips to the base fabric without much incident and a minimal to moderate amount of fudging the corners. 

Huh. I think I pivoted too soon?
This is the back or wrong side of the binding. Not as big a fan of how this looks. 

This bit looks pretty good though. 
I also was not a huge fan of the way you bound the folded-over bottom edge. I didn't think it looked that neat and definitely took a lot of fudging.

Meh.

But I also realized that I don't think you see a lot of properly bound edges on fabric things much anymore. We all seem to like double rolled hems instead.
 Anyway, I finished up that sucker by learning how to stitch the ditch, which is apparently the fancy way to bind things and do waistbands on work trousers. Amongst all the other ways to do waistbands, I guess? As my first time stitching the ditch (which means to stitch over a previously stitched line on one side of the fabric to catch fabric in the back side without having another line of stitching on the front) and having poorly cut materials, I missed the back edge of the binding frequently and had to do more fudging. There's only so much fudging you can do before you pull the binding all out of whack and it gets funny diagonal wrinkles. I don't have pictures of that, of course.
So, there was my 'placemat', all bound and pocket-ed up.

Huh.
 Overall, not bad.
By this point I was again at the 'screw this, I need to get going and I want this done' point in my day. So I quickly decided on 8 pockets, divided up the width, and merrily did channel stitching to create pockets within the pocket.

See, that's how it's done. 

And you know what? It looks pretty good. 
And you know what else? It is absolute rubbish as a knitting needle keeper. ABSOLUTE. RUBBISH. It is not to scale, the pockets are either too wide or too deep or too shallow. Everything keeps slip-sliding around and it is driving me bonkers. Bah humbug.